Using Relay and GraphQL
When we originally planned the app we discussed the choice of data layer and compared Redux (which was eventually used) with an alternative Facebook Open Source project called Relay.
At the time, Redux was chosen because it offered the simpler data implementation of the two, and was quicker and easier to integrate with our Parse data storage.
Once the app was released to the iOS and Android app stores, we wanted to revisit that choice, and look at how Relay could work with our app.
Gradual Evolution
With traditional native app development, the choice to switch the data layer would usually lead to a whole-scale rewrite of the entire app, where the existing functionality would be entirely swapped out.
React Native is very different - we can retain the majority of our existing data setup (Redux, Parse, and the relevant bindings) while also switching to a new data layer for an individual View. Instead of having to rebuild the app from scratch, or do a messy refactor, we can simply adjust one section of the app to use a new data layer and let the rest continue to use the existing layer.
It is worth stating just how huge a benefit this is to continued development of an app - the ability to progressively enhance an app reduces the overhead for maintenance and updates drastically.
So how does using Relay and GraphQL compare to the Redux model of thinking about data?
Introducing Relay and GraphQL
Firstly, and in very simple terms, Relay is the data framework that lives inside the app, and GraphQL is a query language used within Relay to represent the data schema. GraphQL is also run on a server separately from the app to provide a data source for Relay to interact with.
Relay isn't derived from the Flux architecture and is used only with GraphQL, which immediately means a big difference from the Redux model. The Store/Reducer/Component interaction we covered in the data tutorial does not really exist with Relay. It takes a different approach, and removes a lot of the building work you normally need to do when integrating data.
With Relay, each React component specifies exactly what data it depends on, using GraphQL. Relay handles everything about fetching that data, providing the component with updates when the data changes, and caching the data client-side. Anytime the app wants to change the data itself, it creates a GraphQL Mutation instead of an Action as with Redux.
An Example from the F8 App
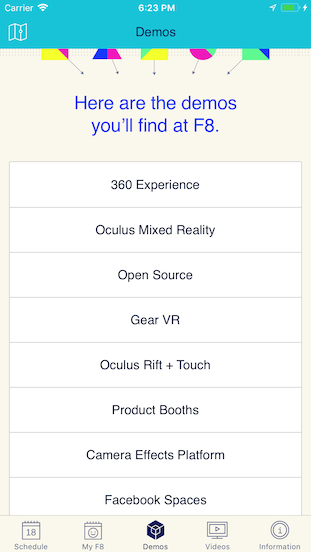
Given the ability to progressively change a small part of a React Native app, we chose, as a kind of proof-of-concept, to swap Redux for Relay in the Demos View of the F8 app:

This part of the app is pretty much entirely separate from the rest, with largely non-interactive content, making it an ideal place to start.
The view itself contains a simple function renderView to render the demos list:
/* from js/tabs/demos/F8DemosView.js */
class F8DemosView extends React.Component {
  ...

  renderView(demos, garages, hasBookables) {
    const hasBothTables = demos.length && garages.length;

    return (
      <View style={styles.container}>
        <View style={styles.header}>
          <F8BackgroundRepeat
            width={WINDOW_WIDTH}
            height={PATTERN_HEIGHT}
            source={require("../../common/img/pattern-dots.png")}
            style={styles.headerBackground}
          />
          <Image
            style={styles.headerIllustration}
            source={require("./img/header.png")}
          />
        </View>
        <View style={styles.contentContainer}>
          <Heading2 style={styles.mainHeading}>
            {"Here are the demos\nyou’ll find at F8."}
          </Heading2>
          {this.renderTable(demos, hasBothTables ? "Demos" : undefined)}
          {this.renderTable(
            this.props.garages,
            hasBothTables ? "Developer Garage" : undefined
          )}
          {this.renderManageReservationsButton(hasBookables)}
        </View>
      </View>
    );
  }

  ...
}
This is just a basic layout with some other simple info displaying components inside of it, but where are the parameters to the render method coming from? Well, inside the same .js file, we have a <QueryRenderer />:
/* from js/tabs/demos/F8DemosView.js */
<QueryRenderer
  environment={environment}
  query={graphql`
    query F8DemosViewQuery {
      demos {
        title
        description
        booking
        location
        links {
          title
          url
        }
        logo
        logoHeight
        logoWidth
        devGarage
      }
    }
  `}
  render={({ error, props }) => {
    const sortedDemos = sortDemos(idx(props, _ => _.demos));
    const demos = sortedDemos.filter(d => !d.devGarage);
    const garages = sortedDemos.filter(d => d.devGarage);
    const hasBookables = !!sortedDemos.find(d => d.booking);
    return (
      <ListContainer
        headerBackgroundColor={F8Colors.turquoise}
        headerTitleColor={F8Colors.sapphire}
        title="Demos"
        leftItem={{
          title: "Map",
          layout: "icon",
          icon: require("../../common/img/header/map.png"),
          onPress: _ =>
            this.props.navigator &&
            this.props.navigator.push({ maps: true })
        }}
      >
        <PureListView
          renderRow={_ => {}}
          renderEmptyList={() =>
            this.renderView(demos, garages, hasBookables)}
        />
      </ListContainer>
    );
  }}
/>
Here we're defining exactly what data the renderView method needs to be displayed, as a GraphQL query. This corresponds to the GraphQL object that we are defining on our GraphQL server:
/* from server/graphql/src/schema/demo.js */
const demoType = new GraphQLObjectType({
  name: "Demo",
  fields: () => ({
    id: globalIdField(),
    title: {
      type: GraphQLString,
      resolve: demo => demo.get("title")
    },
    ...
    devGarage: {
      type: GraphQLBoolean,
      resolve: demo => demo.get("devGarage")
    }
  }),
  interfaces: () => [require("./node").nodeInterface]
});
You can see how the data is fetched by the GraphQL server, then Relay takes care of grabbing all the required data specified in the fragment. This data becomes available as the props parameters in the function passed to the <QueryRender />'s' render prop.
Thanks to Relay's built-in logic, we don't need to worry about subscribing to data changes, or caching data in a Store, or anything else - we just tell Relay what data our component should have, and we design our component in the standard React way. With our GraphQL server already set up, that's all we need to do.
We have no data changes in this view, however if you want to learn more about how they work, please read the Relay docs on mutations.
